Getting Started
To start, go to Sign Up page and register. Enter your name, lastname, email and a unique sitename with password. You will receive a confirmation email for succcessful registration.
Your default domain will be [sitename].centriforge.com
Once you sign up, you may customize your theme, change your site's tagline or add users. You may also take a look on your Page link to add pages, blogs, shop or gallery.
Now you've done with the basic setup. Happy blogging!
Settings
Configuring Site Settings
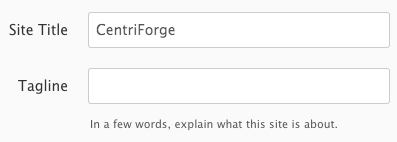
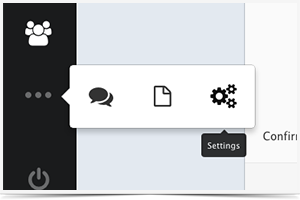
To configure site settings like site title or tagline, click the icon to access the Settings, then click Site. If you cannot find the setting icon from default menu, click "more" icon and find the settings icon there.
Site Title and Tagline. Site title is displayed in the title bar of web browser and in the header for most Centriforge themes. Site title can be anything and will not affect your site address. Tagline is a short description or phrase that describes your website. Some themes displays site's tagline.
Email Address is the admin email. All account notices, warnings, or other automatic email updates will be sent to this address. Replies to support tickets submitted from within your Centriforge site will also be sent to this address so keep this email address active. This email address will also be use to send notifications to users.

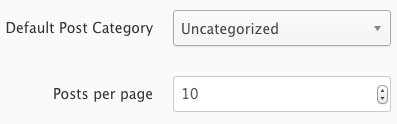
Other Site settings. The Default Post Category lets you select the category to be applied to a post if you forget to assign categories before publishing. Post per page lets you choose how many blog posts are displayed per page. The default setting is 5 posts per page.
Google Analytics ID, Twitter ID, and Facebook ID is use in most themes.
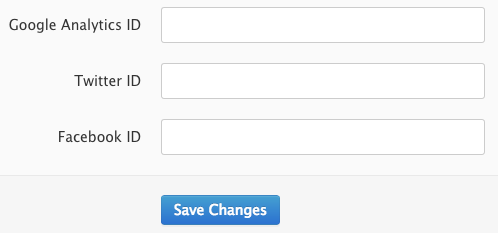
Remember to click Save Changes after making your changes to save them.
Managing Personal Account
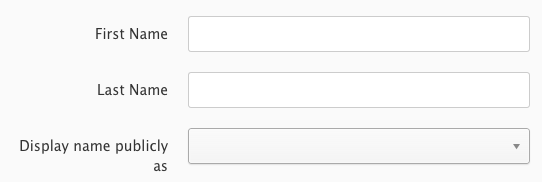
To edit personal settings, click "My Account" link (your email avatar) from the left menu.
Display Name is the name that is seen on your posts and comments. If you want to change this, change the value of the dropdown next to 'Display name publicly as'
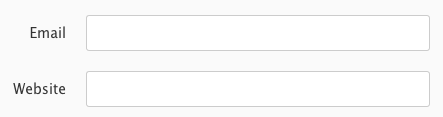
Email Address. Email address is use to login into your site.
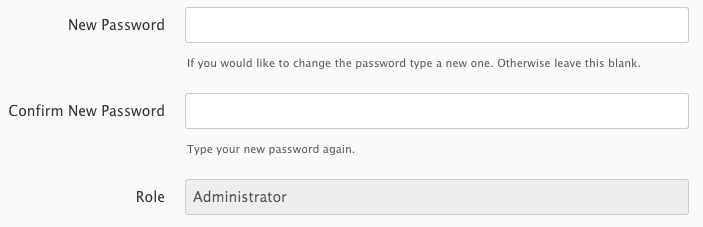
Change your password. If you would like to change your password type a new one into both input boxes. Otherwise leave these blank.
It is very important to keep your passwords secure and to remember them, but there might come a time when you forget a password. Learn how to retrieve your password here.
Administrators set user's role. Contact your site administrator to change your role.
Remember to click 'Save Changes' after making your changes to save them.
Users
Adding and Managing Users
Administrators has the right to add and manage users in their 'Users' tab. Administrator can invite users to publish posts or help approve comments. Users can be a Contributor, Editor, or Author on blog.
Adding Users. To invite user, click 'Add New User' button from the top right of Users screen. Enter the necessary information from the new user modal. Select either Contributor, Editor, Author or Administrator from the role dropdown. Click 'Save' button.
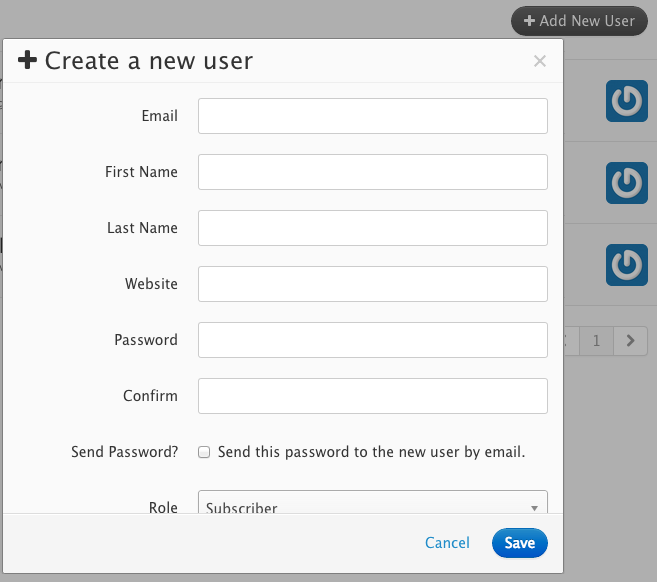
Be very careful when adding a new Administrator user to your blog. Such Administrators have as much right over your blog, including the ability to permanently delete it.
Edit Users. To edit user, click user name from the list and continue editing. Click 'Save Changes' button after making the changes.
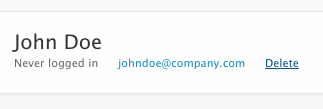
Deleting Users. To delete user, click 'Delete' link below the user name.
User Role
The following are the roles and rights for each user added to your site:
Administrator. Someone who has full and complete ownership of the site, and can do absolutely everything. Adding, editing and even deleting the entire site.
Editor. Somebody who can publish and manage every posts and pages including the posts of other users.
Author. Somebody who can publish and manage their own posts. Authors do not have access to modify, add, delete, or publish pages.
Contributor. Somebody who can write and manage their own posts but cannot publish them. However, published post can no longer be modified by the contributor.
Billing
How to sign up for paid service?
It's easy to upgrade your trial account to paid service.
- Login to your admin page.
-
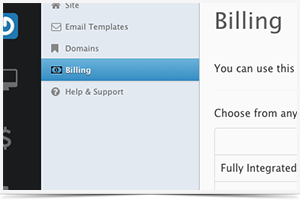
Navigate to your setting page. (If you cannot locate setting icon, click 'More' menu and find the setting icon)
- From setting page, select 'Billing' from the sub-menu to access your billing area.
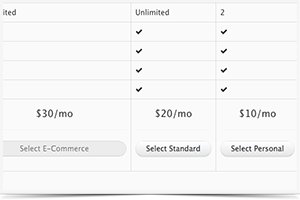
- Click the plan button to select the desired billing plan from the pricing table.
- You will be directed to Paypal site for your payment. Payment will be made for merchant name Brychetech Internet Solutions Company.
- Once you've completed your payment, you can review your payment history found at the bottom of the pricing table.
How to view invoices?

Payment can be viewed directly to your admin billing page. All payment made are displayed and listed on the payment history table.
Click 'View' link below the Invoice column to view the desired invoice.
How to cancel service?

If you have decided to no longer use your subscription, you can follow these easy steps to cancel it.
- Login to your admin page and navigate to billing area.
- Click the 'Remove Account' button to cancel your subscription.
- A warning message will prompt to confirm your decision. Click 'OK' button to confirm.
- Note: Your site be set to expire at the end of the billing period and will no longer be possible to access.
How to re-activate cancelled/expired account?
Admin site can still be accessible even if you have cancelled subscription, only the front-end site will be inaccessible to the users. To reactivate cancelled or/and expired account, follow below steps:
- Login to your admin page.
- Navigate to Settings->Billing area.
- Choose your plan and pay the necessary charges.
- After paying, check your website and it should be running again.
Commerce
SEO
Creating Content
Pages
- Simple Pages
- Blog
- Gallery
- Create new Gallery
- Add Post to the Gallery
- Shop
- Create new Product
- Product Variants
- Product Categories
- Product Tags
Tags and Categories
Widgets
Pages Navigation
- Publishing
- Deleting
- Moving
- Setting page parent
Comments
Comments give the opportunity to interact and converse with the author and other visitors. It is an easy way to involve your reader in your topic and generate valuable feedback. Post with enabled commenting can also help promote your website since Google is looking for fresh and updated content (that's when visitors start commenting).
Setting
Once visitor submit comment, Centriforge holds the comment for the admin to approve before displaying it to the comment list. With this setting, admin will have time to review and separate comments from relevant comments to that of spam comments.
Post Comment Status
There are three comments status for the post where you can choose.
- Open - this will enable commenting on post. Note that this is the default comment status, so be better change it if you do not need comments on specific post.
- Closed - will disable commenting on post. The easiest way to prevent spams is to disable commenting but this will also limit discussions on your post.
- Registered Only - this status limit commenting only the users of the site. It will make sure that the comment comes from known users and is a relevant comment.
How to turn on/off commenting on post
Modifying commenting status on your post is very easy. Open editor of the desired post, click on the info icon on the settings menu (found at the right side of the editor), and then locate the comment status dropdown menu. Choose the desired comment status and click save button to finally activate your changes.
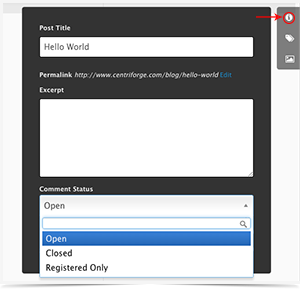
Comment Status
If you have decided to turn on post commenting and visitor submit comment, the comment will be added to the pending list and will wait for the approval of the moderator or the admin. There are three comment statuses.
- Approved - are comments that will be displayed and visible to the visitors.
- Pending - is the default comment status. These are comments waiting for moderation.
- Spam - are irrelevant comments and will not appear on your site.
Managing Comments
When you start receiving comments, you can easily manage it using two different ways. Submitted comments will be listed on Comment Module and in the Others Tab of the post where the comment is made. From the list you can easily approved, unapproved, reply, edit, delete or move to spam. The list provide enough information about the comments such as the comment content, the post where the comment is made, the name of the author, and the date when the comment is submitted.
- Comment Module
Comment Module provides an easy way to manage comments. By default, all comments are listed. To filter comments, click the desired status found on the top right of the screen. Comments can be filtered by "Approved", "Pending", or "Spam".
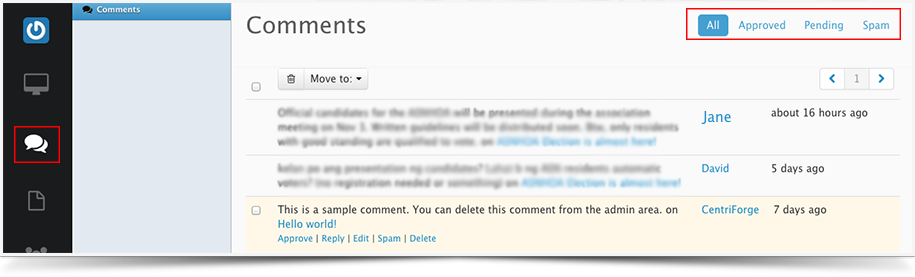
Hover over the comments to see the different moderation options and click the desired status.

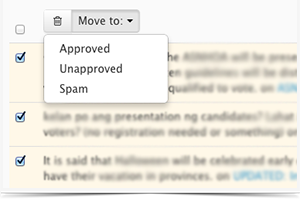
For bulk editing, select the comments by checking the checkbox before the comments, and then select "Approved", "Unapproved" or "Spam" from the Move to dropdown. Or you can also click the trash icon for bulk deleting.
- Post Others Tab
From the post editor, click the Others tab to see the comments submitted for that post. Administrator can easily add new comment by selecting "Add New Comment" link. Comment created by administrator is automatically approved and will be displayed in the comment section of the post.
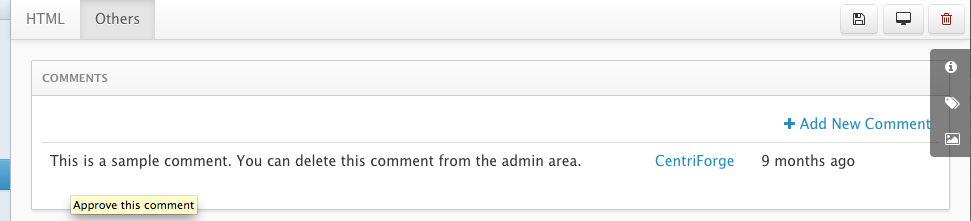
Just like in Comment Module, you can hover over the comment to see and click for the moderation options.
How to Reply? Website admin can reply comments thru the Comment Module or from Post Other Tab. Admin reply are automatically approved. Hover over the comment, click reply from the moderation options and enter reply content on the textbox. Click reply button.
How to Edit? There are times when admin needed to modify comments submitted. To do this, hover over the comment, select Edit from the moderation option, and edit desired content. Click Update button to save changes.
Comment Avatars
Avatars are the pictures displayed next to users name. You can usually see this on comment section of the sites. Centriforge uses Gravatars for this. If you are a registered user in Gravatar , Centriforge matches your provided email with that of your email in Gravatar, grab your custom Gravatar image and displays it next to your name. Else if you are not a Gravatar user, Centriforge displays the default avatar image.
Custom Domains
Using a custom domain, site visitors can use the custom domain in their address bar when visiting your site instead of the default CentriForge subdomain provided. The provided domain is still working but will reroute all traffic to the custom domain.
Step 1 - Login to your domain registrar account
Login to the registrar where you bought your domain.
Step 2 - Open up the domain from the management console
Make sure that the nameservers are pointed to the default nameservers of your registrar
Step 3 - Create a CNAME
Create / Edit the www CNAME and point it to your centriforge domain (e.g. yourcompany.centriforge.com)
Step 4 - Forward your root domain
Forward the root domain (e.g. yourtlddomain.com) to the www subdomain (e.g. www.yourtlddomain.com) you just created, don't enable masking
Step 5 - Link the subdomain to CentriForge
To do this, go to Settings module then click Domains link. Click 'Link Existing Domain' found at the top right of the screen then enter the mapped domain into the form. Click 'Continue' button to finally associate this domain.
Domain mapping can take some time for the change to take effect, so give it a few hours.
Once you enter a domain name here, it will be used immediately. But if it doesn't clear browser cache and try to reload your page.
Customizing Sites
CentriForge has a growing collection of gorgeous and sleek themes, which you can see here. Site Themes determine the look of the website you are building. It includes information about the general layout of the site, blogs, pages, galleries and other content such as images, javascripts and css. From the Appearance page, you can see the current theme used and also the themes installed which are available for use.
Changing Site Theme
Theme can be changed anytime you want. Theme can be changed by simply Installing (if the theme is not yet added on your available theme list) and Activating the desired theme.
Click Install Themes link found at the top right of your admin/appearance to view list of templates ready for installation. Remember that only the Administrator can access Appearance page.
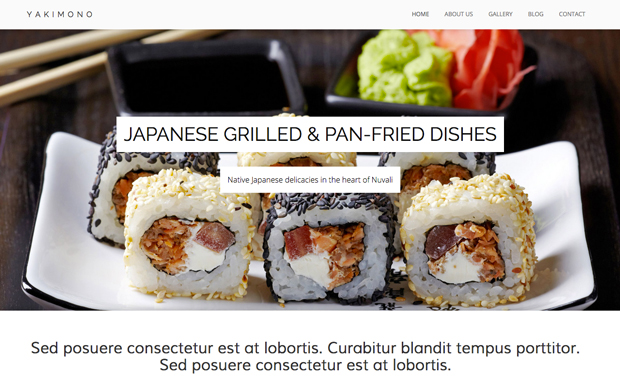
Here is an example of theme available for installation.
If you want to check and see how a particular theme looks like, click Visit Theme Site link found below the theme. And if you have decided for the theme you want, click Install link. The installed theme will now be included in your list of available themes ready for activation.
If you want to create your own theme, you can download this starter template and upload it later using the Theme upload link found on the top right of the Appearance page.
You may now click Manage Theme link found at the top right to view all installed themes. To Activate the theme, find the theme and simply click Activate link. Now your site has a new look.
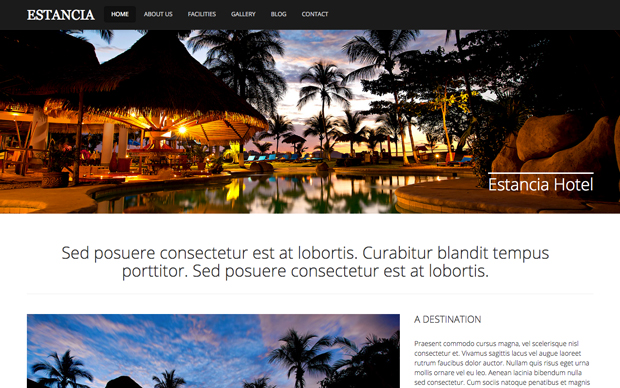
Here is an example of installed theme ready for activation.
Unused theme can also be deleted from the list of available theme by clicking Delete link that appears below the theme.
Theme Editing
Activated theme can be easily modify using the theme editor. From the Appearance/editor, you can view list of all the files necessary for the current theme. The theme editor page gives you access to the CSS Editor, which lets you modify the theme's fonts, colors, borders or even backgrounds. However, you need to know CSS to make these changes. If you do not enough knowledge and want to customize your site, we recommend you to add custom.css and make the necessary adjustment. Theme editor also gives you access to other files which lets you modify layout of your blog, gallery and even site homepage.
To edit file, click the file from the list and make the necessary changes. Once you are finished making changes to the code, Ctrl+s[Win] / Cmd+s[Mac] to save changes.
Check here for necessary syntax when editing views such as layout, blog and gallery.
Note that the changes you make to files using the theme editor are instant; the changes happen online and in real-time. You and any visitors to your site will see the changes immediately.
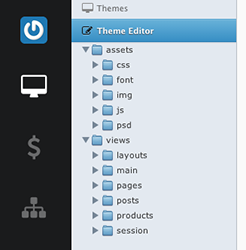
Centriforge Themes typically consist of two main folders of files, the views and assets folder.
- assets consist of css files, scripts and images that controls the visual design of the website.
- views consist of files that controls the way the site pages generate the information from database to be displayed on the site.
- layouts/main.mhtml is the main template that consist of the general layout of the site.
- main/error.mhtml used when Centriforge cannot find a post or page that matches the query.
- pages/blog.mhtml used to display all post where type is blog.
- pages/gallery.mhtml used to display all post where type is gallery.
- pages/home.mhtml is the home page template, which is the front page by default.
- pages/page.mhtml is used for individual post where type is page.
- post/archieve.mhtml
- post/categories.mhtml used when category is queried.
- post/gallery_post.mhtml used to display single post from gallery
- post/post.mhtml used to display single post from blog.
- post/sidebar.mhtml is the template use for pages sidebar.
- post/tags.mhtml used when tag is queried.
- session/login.mhtml a template for the login page
Template Snippets
A template snippet is a small chunk of html that you can use to extend the display of the page. It can be added in another page to include it in the final page display. An example of this is when you wanted your blog post to have sidebar on the left then you need to include the sidebar tags in your post template.
The syntax of adding template snippet:
{{> [route/filename] }}
Here is an example of template snippet usage:
To include sidebar, use {{> posts/sidebar}}
For custom template snippet (if we have news.html template inside snippets folder), use
{{> snippets/news }}
Template snippet is an easy, simple and clean way of separating html codes. You can add template snippet as many as you want in a page. Simply create the template snippet and add the tag inside the page.
Managing files
By right clicking on theme editor, you can upload file, add new file, create new folder, delete file and rename file. Files can be uploaded such as additional css, images and javascript. To do this, right click on the folder where you want the file to be added and click Upload file.
Upload modal is shown below.
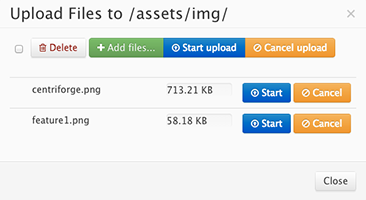
Click "Start Upload" button for multiple uploads or click âStartâ button for single upload of file. When the upload is complete, a field with your file detail appears. Click close button and check on the folder where you upload your file.